


This article will show how to build a blog (or any other static content) using a very popular JAMstack (GatsbyJS, GraphQL, Markdown) and host it on static website hosting for Azure Storage, which provides a cost effective and scalable solution for hosting static content and JavaScript code.
We will demonstrate how to optimize the website and provide global reach by enabling Azure CDN. And, to make all the blog posts continuously build and deploy to Azure, we will utilize Azure Pipelines. Then, we will provision Azure resources using the simple and powerful language of Terraform and a Docker container running inside the pipeline. The following diagram shows the workflow described in the article:

What is JAMstack
Static site generators have been around for a while — tools like Jekyll and Hugo are widely adopted. Recently the notion of JAMstack is making a buzz. It is a modern web development architecture based on client-side JavaScript, reusable APIs, and prebuilt Markup. The main difference with traditional CMS based systems (like Drupal or WordPress) is that there is no backend logic or persistence layer access — everything is encapsulated in the API.
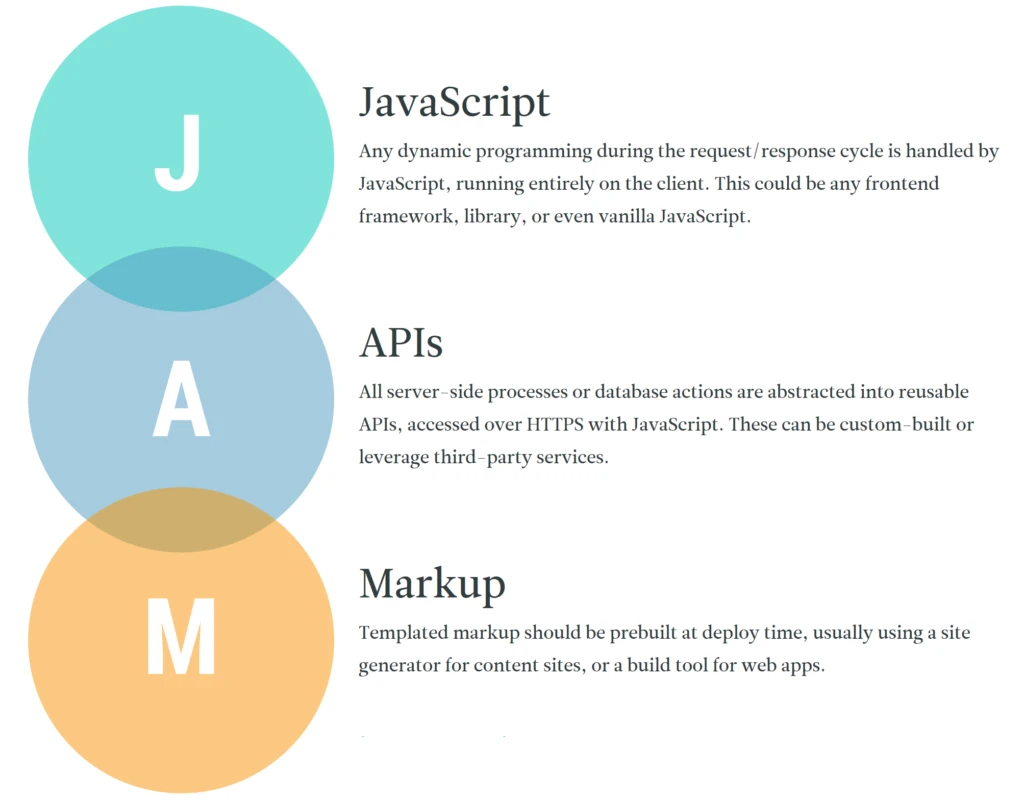
Image from jamstack.org
The key benefits are:
- Faster to load – just static files, no server side
- Cheaper – no servers to maintain
- Easier to scale – serve files in more places like CDN
- Developer experience – easier to develop
- Security – best practices encapsulated in API
You can see a lot of JAMstack examples listed on their site.
Why GatsbyJS
GatsbyJS is a new player in JAMstack and is quickly gaining popularity. At the time of this writing, it is in the fourth place according to https://staticgen.com.
What makes GatsbyJS especially attractive is the power of the latest web technologies – React.js, Webpack, modern JavaScript, and GraphQL API.
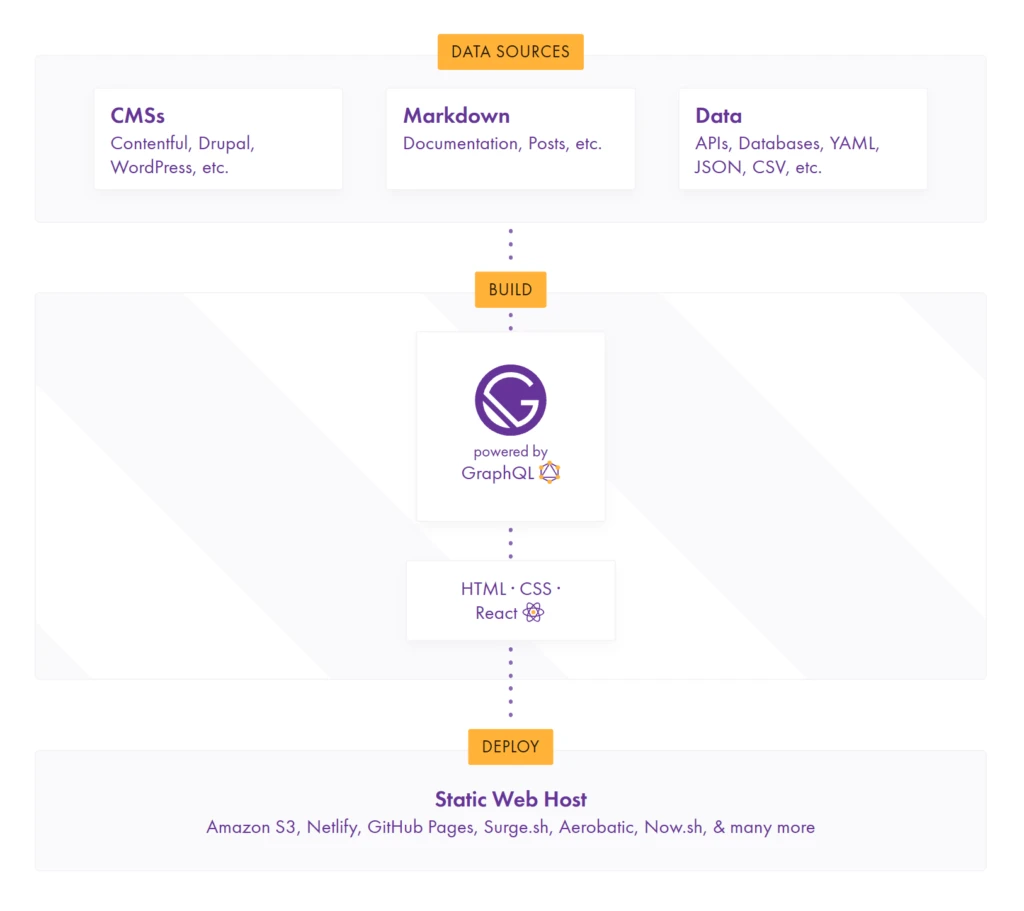
Image from gatsbyjs.org
The process for building the site in Gatsby could be summarized as:
- Defining data sources (GitHub markdown in our example)
- Querying data with GraphQL and making it available to the page
- Rendering data using React components
- Generating static pages and hosting it (Azure Static site in our example)
Among the main benefits of GatsbyJS is the usage of familiar frontend technologies such as React and Webpack, extensibility – it has tons of plugins (PWA, SEO, etc.), optimized performance, and build tooling. The only downside I noticed is that for now it does not have as many themes built by communities as for Hugo or Jekyll, but it is already growing.
Creating a Gatsby site
For my blog I have chosen clean and simple GatsbyJS minimal blog starter: https://github.com/LekoArts/gatsby-starter-minimal-blog. It has all the basic features and plugins already integrated – Markdown, Styled components, offline support, and SEO. To start, the site based on this template, install Gatsby CLI and generate the site (the only prerequisite is node.js):
npm install --global gatsby-cli
gatsby new gatsby-site https://github.com/LekoArts/gatsby-starter-minimal-blog
To start the generated site in develop mode that supports hot reload:
>cd gatsby-site
>gatsby develop

success update schema — 0.623 s
success extract queries from components — 0.734 s
success run graphql queries — 0.208 s — 4/4 20.57 queries/second
success write out page data — 0.150 s
success write out redirect data — 0.006 s
⡀ onPostBootstrapdone generating icons for manifest
success onPostBootstrap — 0.501 s
info bootstrap finished - 157.202 s
 DONE  Compiled successfully in 20983ms

You can now view gatsby-starter-minimal-blog in the browser.

  http://localhost:8000/

View GraphiQL, an in-browser IDE, to explore your site's data and schema

  http://localhost:8000/___graphql

Note that the development build is not optimized.
To create a production build, use gatsby build
Navigate to the site or graphql endpoint to learn the query language. Now we will customize the site to have nice Azure blue colors.

- Modify global site settings in config/SiteConfig.js
- Add blog posts in blog
- Update theme style in config/Theme.js
- Go over plugins in gatsby-config.js
- Adjust styles in components/Layout.js
As we are going through the changes, they are immediately compiled and the page is reloaded, making the developer feedback loop very fast. Below is the result the changes, and the site is added to GitHub here.

Setting up CI/CD with Azure Pipelines
To host the site on Azure, one of the best options is to use Azure Static Site for Storage and enable Azure CDN for global presence. The steps we need to automate are:
- Generate static files from Gatsby react.js components using `gatsby build`
- Provision the Azure Storage account
- Enable Static Website option on storage account (See Microsoft blog for details)
- Provision Azure CDN profile and endpoint with origin pointing to Storage account web URL (CDN for blob)
- Upload static assets to $web container in storage account
Following best DevOps practices, we will separate Build and Deployment phases into two pipelines – one is responsible for building the site, and another for provisioning Azure resources and deploying the files.
Enabling Azure Pipelines is a process of just a few clicks as integration is now available in GitHub marketplace.

Search `Azure` in the Marketplace and click it and Authorize Azure Pipelines to access the GitHub repository with the blog. You’ll be prompted to create a DevOps organization and project:

It will analyze the repo and suggest the build template based on the content. In our case it’s Node.js with React.

The resulting YAML pipeline `azure-pipelines.yml` will be added to the repository. We will add few more tweaks to install and run Gatsby CLI and publish the resulting build artifact:
pool:
  vmImage: 'Ubuntu 16.04'

trigger:
  branches:
    include:
    - master

steps:
- task: NodeTool@0
  inputs:
    versionSpec: '8.x'
  displayName: 'Install Node.js'

- script: |
    npm install -g gatsby-cli
  displayName: 'install gatsby'

- script: |
    cd gatsby-site
    npm install
    npx gatsby build
  displayName: 'gatsby build'


- task: CopyFiles@2
  inputs:
    sourceFolder: 'gatsby-site/public'
    contents: '**'
    targetFolder: $(Build.ArtifactStagingDirectory)
    cleanTargetFolder: true
  displayName: 'copy built site'

- task: PublishBuildArtifacts@1
  inputs:
    pathtoPublish: '$(Build.ArtifactStagingDirectory)'
    artifactName: 'drop'
    publishLocation: 'Container'
Azure Pipelines comes with a lot of prebuilt tasks and good documentation available for copy/paste into YAML files.
Our pipeline uses `NodeTool` task that installs the required version of node.js, and enables us to run the steps to install Gatsby and generate the Gatsby site. We also use `Copy Files` and `PublishBuildArtifacts` to make the artifacts available to our deployment pipeline. By default, CI and Pull Request validation is enabled and as we push code to git, pipeline invoked and builds the site:

Continuous Deployment Setup
Although Azure Pipelines have a Release pipelines construct, it does not yet support YAML. So, we decided to follow the “Pipeline as Code” principle and create the deployment pipeline using the same Azure build pipeline syntax.
The idea is that the Deployment pipeline will be triggered only if Build has completed or if files related to infrastructure have changed. All the deployment files and pipeline are placed in the repo in the `deploy` folder.
We have created one more Build pipeline and pointed it to `deploy/azure-pipelines-deploy.yml`.

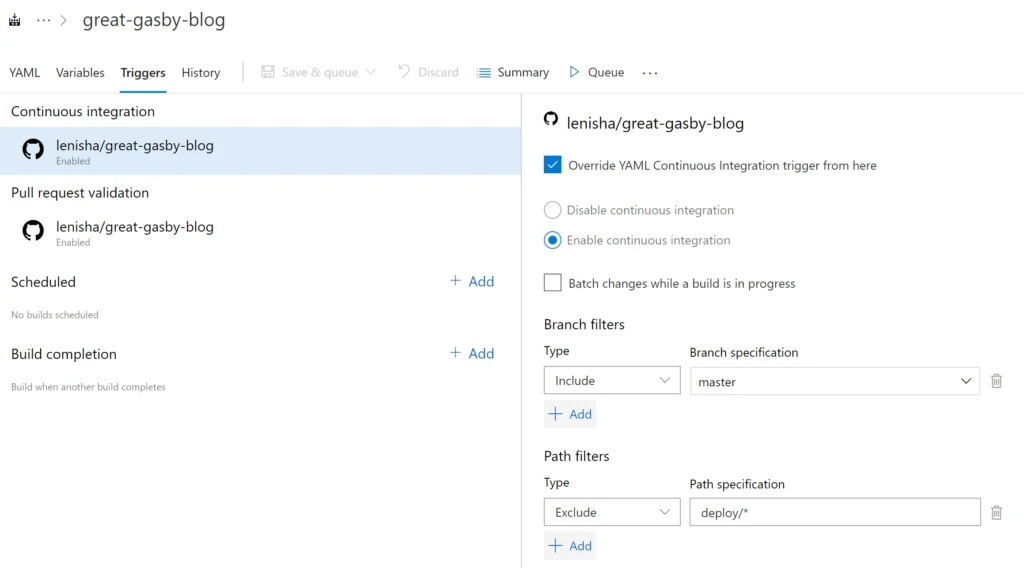
To make sure Deployment is invoked after the build – use a combination of Triggers (build completion is not yet supported in YAML so we do it in designer) – Continuous integration includes only “deploy/*” path, and Build Completion is linked to our build pipeline.

Now to make sure Build is only triggered when the website content is changed and not deployment artifacts, add a Trigger that excludes “deploy/*” from the continuous integration in our Build pipeline and includes master branch (we will see later how to build and validate code in branches):
As a result, we have two phased Build and Deployment processes where any change to content triggers Build and subsequently the Deployment pipeline, and any change to deployment assets Triggers only the Deployment pipeline.
Terraform Azure Static Website and CDN
Provisioning resources with Terraform HCL is pretty straightforward – setup the storage account that will store the Terraform state and point to it in `backend.tfvars`, copy and paste the Azure Storage account and CDN resource definitions from the Terraform AzureRM provider website. The full code is available in GitHub.
Note that there are a couple of tweaks we had to do to enable the Static Website feature as it is currently only supported though Azure CLI or API. (No ARM or Terraform support yet). To do that there is a `local-exec` provisioner provided by Terraform to run the scripts. Here is the snippet that runs the Azure CLI command to enable the static website for storage:
resource "azurerm_storage_account" "webblob" {
  name                     = "${var.dns_name}"
  location                 = "${azurerm_resource_group.demo-rg.location}"
  resource_group_name      = "${azurerm_resource_group.demo-rg.name}"
  account_kind             = "StorageV2"
  account_tier             = "Standard"
  account_replication_type = "LRS"

   provisioner "local-exec" {
    command = "az storage blob service-properties update --account-name ${azurerm_storage_account.webblob.name} --static-website  --index-document index.html --404-document 404.html"
  }
}
Once the static website is enabled it provides the read only endpoint URL to access the website. We need to get this URL as it will be used by Azure CDN as origin. It’s a complicated task as this feature is not managed by Terraform, and it’s hard to get output from commands to variables.
Fortunately, there is a great Terraform Shell Resource Module available that helps to manage the output of shell commands https://registry.terraform.io/modules/matti/resource/shell/0.3.1. Here is the code that queries the Storage account to get the endpoint:
module "query_url" {
  source  = "matti/resource/shell"

  command = "printf $(az storage account show -n ${azurerm_storage_account.webblob.name} -g ${azurerm_resource_group.demo-rg.name} --query \"primaryEndpoints.web\" --output tsv | cut -d \"/\" -f 3)"
}
Now we can provision Azure CDN and CDN Endpoint pointing to our Static Website:
# Create Azure CDN profile
resource "azurerm_cdn_profile" "webblob-cdn" {
  name                = "${azurerm_storage_account.webblob.name}cdnprofile"
  location            = "${azurerm_resource_group.demo-rg.location}"
  resource_group_name = "${azurerm_resource_group.demo-rg.name}"
  sku                 = "Standard_Verizon"
}

# Point Azure CDN profile to web endpoint for Static website
resource "azurerm_cdn_endpoint" "webblob-cdn-endpt" {
  name                = "${var.dns_name}"
  profile_name        = "${azurerm_cdn_profile.webblob-cdn.name}"
  location            = "${azurerm_resource_group.demo-rg.location}"
  resource_group_name = "${azurerm_resource_group.demo-rg.name}"
  is_http_allowed     = "false"
  optimization_type   = "GeneralWebDelivery"
  origin_host_header  = "${module.query_url.stdout}"
  querystring_caching_behaviour = "IgnoreQueryString"

  origin {
    name      = "assets"
    host_name = "${module.query_url.stdout}"
    https_port = "443"
  }
  depends_on = ["module.query_url"]
}
Terraform Deployment Pipeline
Coming back to automation, our deployment pipeline will have to download Build artifacts from the successful Build and invoke Terraform to provision infrastructure, then upload site artifacts to the storage account.
Azure Pipelines has a very powerful ability to run the tasks in a container that could be downloaded from DockerHub or ACR. To enable our pipeline I have built a small lightweight container based on Ubuntu 16.04 with just Terraform and Azure CLI tools here: https://hub.docker.com/r/lenisha/terraform-light/. It is used in our deployment pipeline below:
resources:
  containers:
  - container: terraform_container
    image: lenisha/terraform-light

pool:
  vmImage: 'Ubuntu 16.04'

container: terraform_container
Once container is downloaded and run by the pipeline, we add steps to run the Azure CLI Login (required for Terraform to be able to run our az cli commands) and to deploy the Terraform scripts:
- script: |
    az extension add --name storage-preview
    az login --service-principal -u $(ARM_CLIENT_ID) -p $(ARM_CLIENT_SECRET) --tenant $(ARM_TENANT_ID)
  displayName: 'Enable AZ extension and Login'

- script: |
    cd deploy/terraform
    terraform init -backend-config=backend.tfvars
    terraform apply -auto-approve -var dns_name=$(BLOB_NAME)
  displayName: 'Terraform init and apply'
  env:
      ARM_TENANT_ID: $(ARM_TENANT_ID)
      ARM_SUBSCRIPTION_ID: $(ARM_SUBSCRIPTION_ID)
      ARM_CLIENT_ID: $(ARM_CLIENT_ID)
      ARM_CLIENT_SECRET: $(ARM_CLIENT_SECRET)
      ARM_ACCESS_KEY: $(ARM_ACCESS_KEY)
To connect Terraform to a subscription and backend storage for state, create Service Principal and add Pipeline variables for the Azure subscription and Service Principal:
- ARM_SUBSCRIPTION_ID, ARM_TENANT_ID : Subscription (run az account list in Azure CLI to find out tenantId and subscriptionId )
- ARM_CLIENT_ID, ARM_CLIENT_SECRET: Service Principal is and password obtained when creating SP
- ARM_ACCESS_KEY: Backend State Storage account access key

In addition, define BLOB_NAME variable – it will be the name of the blob site and it is used in the URL constructed for the blog: https://BLOB_NAME.azureedge.net
As a next step, add tasks to Download build artifacts, and upload the static artifacts to the storage:
- task: DownloadBuildArtifacts@0
  inputs:
    buildType: 'specific' # Options: current, specific
    project: 'gatsby-blog' # Required when buildType == Specific
    pipeline: 'great-gasby-blog' # Required when buildType == Specific
    downloadType: 'single' # Options: single, specific
    artifactName: 'drop' # Required when downloadType == Single
    downloadPath: '.'

- script: |
    az storage blob upload-batch -s drop -d \$web --account-name $(BLOB_NAME)
  displayName: 'copy content and site is ready https://$(BLOB_NAME).azureedge.net/index.html'
The resulting job view:

Once everything is deployed, we now have full CI/CD enabled for our blog posts on Azure Static Websites and optimized using Azure CDN. If you need to assign a custom domain, it could be done in Azure CDN. Refer to this tutorial.
Validating Pull Requests in CI
It’s a best practice to follow a git flow and work in a branch where code could be first built and tested before making it the master branch and eventually to deployment. In our setup we have included feature branches in a trigger for the Build pipeline. As Azure pipelines are now integrated with GitHub, we can see immediate feedback from the Build in the PR.
To make sure that failed builds prevent the team from automatically merging the code disregarding the failed checks, setup GitHub policy in branch protection rules for the project – due to integration with Azure Pipelines we established earlier it would allow to assign the Build pipeline as the required check.

Here is how the error in the code of the pull request is shown in GitHub – our Azure Pipelines Build kicked off and reported failure blocking the merge and requiring attention:

Conclusion
In this article we have demonstrated the power of the GatsbyJS JAMstack and Azure Pipelines. With just few tweaks, a scalable and cost-effective blog site is up and running on Azure Static Websites and it is integrated with a CI/CD process. We could author blog posts in Git markdown and have the website automatically updated with new content. We showcased a “Pipeline as Code” implementation, using Azure YAML pipelines, and how to use Docker images to bring the necessary Build tools. Terraform is great tool for infrastructure-as-code, but be aware that some preview features are not available and have to be dealt with.
The full code for this article is in GitHub here.