

How Drasi used GitHub Copilot to find documentation bugs
How Microsoft uses AI agents and Drasi to keep open‑source documentation accurate and working.

As we explained in an article introducing the project, Hyperlight enables host applications to run small, embedded functions using hardware-based (hypervisor) protection to ensure the application host cannot be attacked by untrusted code in the guest function. It can do so at incredible speed, creating a new “micro virtual machine” or micro-VM in less than 2 milliseconds, which means when used per-request it can protect each request from the others in addition to the host application. Furthermore, because the micro-VM does not contain an operating system but only a function process, it can be as small as needed, dramatically reducing host resource requirements.
This usage of hypervisors is brand new and still a little harder to use; up until now, for example, it was very hard to debug—something that developers need to understand how their code runs inside the micro-VM.
We are happy to announce that now, you can interactively debug Hyperlight guest micro-VMs. This article describes how to attach the GNU Debugger (GDB) at runtime to step through the code in your guest micro-VM and what debugging features are supported.
Modern development includes interactive, step-by-step debugging as one of the core tenets of usability. Languages and platforms are harder to use if logging or “printf debugging” must be used.

With logging or printf debugging, you must rerun the program each iteration, transforming the developer “inner loop” into “coffee time”. You put your programmer hat on, get a cup of coffee, and prepare to dig in.
It’s vastly better to attach to the running process, set breakpoints, inspect memory, and step through the code so that you can fix the issue. Just as important, from a newcomer’s perspective, is stepping through the guest code to check what happens at runtime because it provides a better idea of how things work.
Let’s use GDB to interactively debug a function running in a Hyperlight micro-VM guest.
For the purposes of this article, you’ll use the GNU Project Debugger as your debugger (though you can also use the LLVM Debugger, or LLDB, using the same instructions).
To start a debug session for an application running on an operating system, you attach to the process. Then the debugger takes over and uses the operating system to inspect its memory and send signals to stop or continue execution.
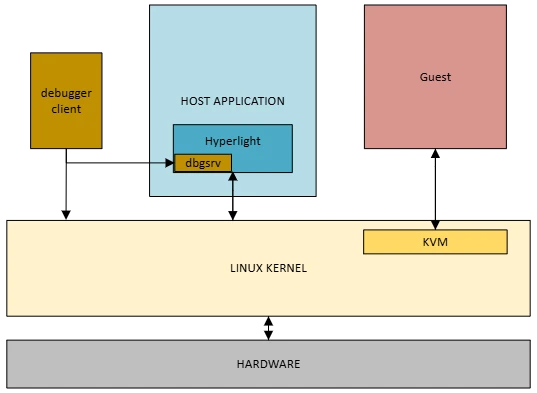
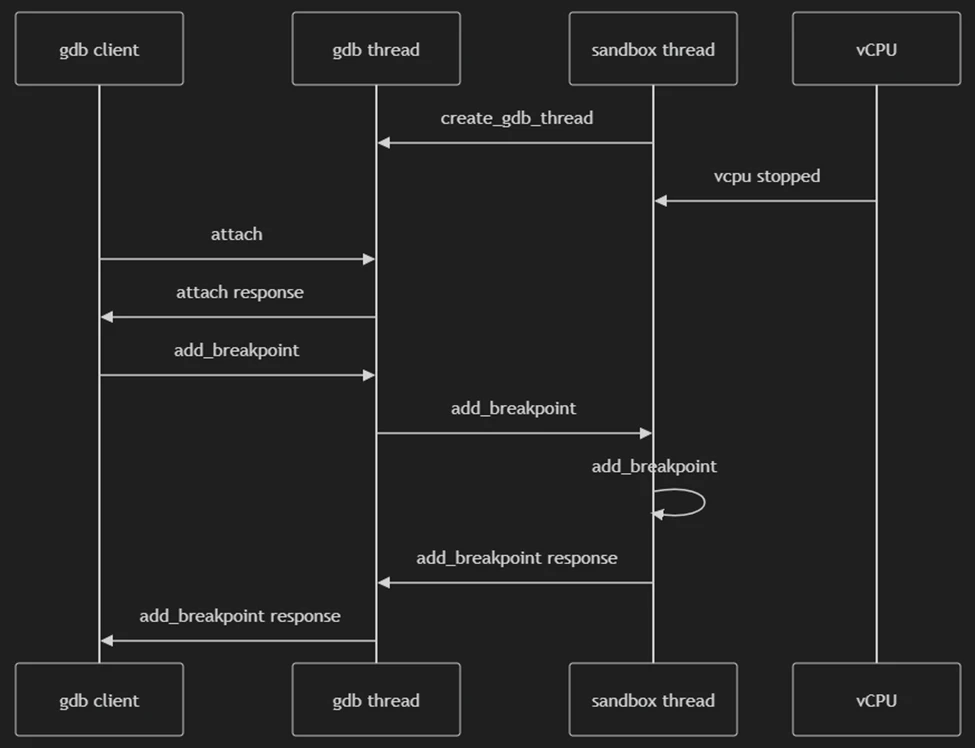
However, Hyperlight does not run an operating system in the micro-VM and therefore must attach to the guest code in a different way. Hyperlight conducts the debug session through the running host application. The following diagram shows how we do this.
As the know-it-all Wikipedia says: “The GNU Debugger is a portable debugger that runs on many Unix-like systems and works for many programming languages …”.
Being one of the most used debuggers out there, Hyperlight introduces support to enable guest debugging using GDB. LLDB works as well; please see the repo documentation for more information about using LLDB.
Hyperlight allows debugging for guests created by all hypervisors (KVM, MSHV, and HyperV on Windows) and includes support for:
For more information on how to set up VSCode to use GDB and LLDB, follow the guides in the Hyperlight repository documentation.
Let’s debug a guest running in a Hyperlight sandbox using the example described in our previous post: Hyperlight: Achieving 0.0009 second micro-VM execution time.
You need to clone the repository containing the demo, open it in Visual Studio Code, and start a devcontainer when prompted. This starts a development container that is provisioned with everything needed to run this demo.
Open a terminal in the dev container and run the demo-main application that uses the already built guest binary demo-guest-debug.
cd demo-main
cargo run –features gdb
After the application starts running the HTTP server, you will be prompted to open the browser. You can either do that, or open another terminal in VSCode and issue an HTTP request using the /hyperlight/hello-world/cold route. The other routes in this host application do not start the debugging process, which you can see here.
curl http://127.0.0.1:3030/hyperlight/hello-world/cold
Notice that it hangs? This is because the web server host application has started the Hyperlight sandbox, but the host is waiting for the debugger to attach before it handles the request.
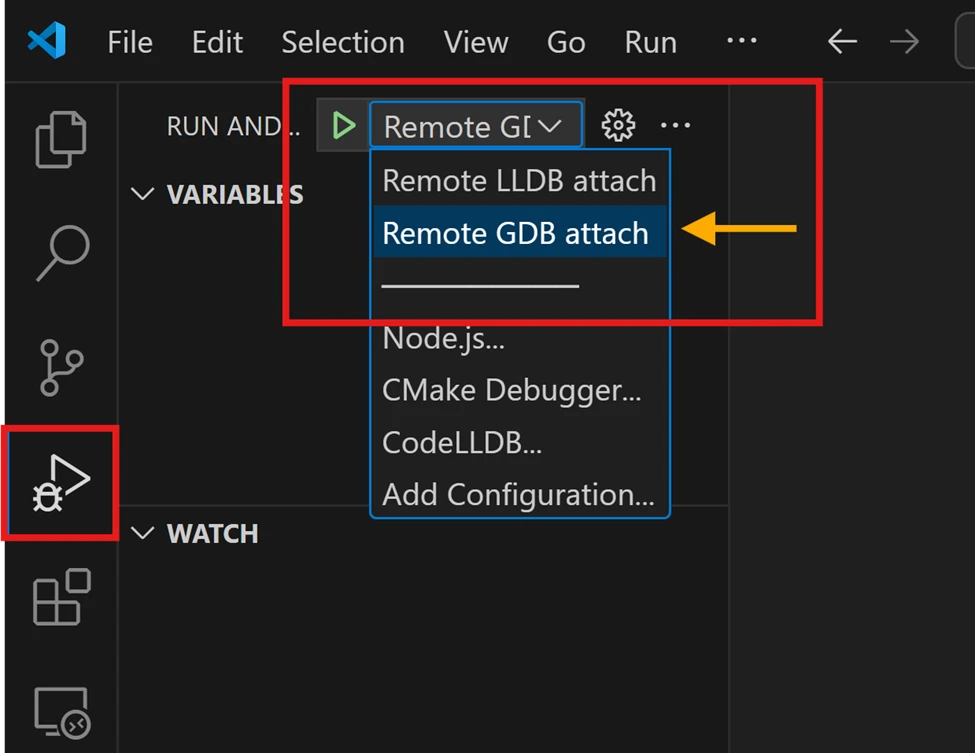
Let’s not make it wait. In the top left corner, go to the Activity Bar and select Run and Debug activity (or press Ctrl+Shift+D). Select Remote GDB attach from the dropdown list and click on the green play button to initiate a debug session using GDB in VSCode.
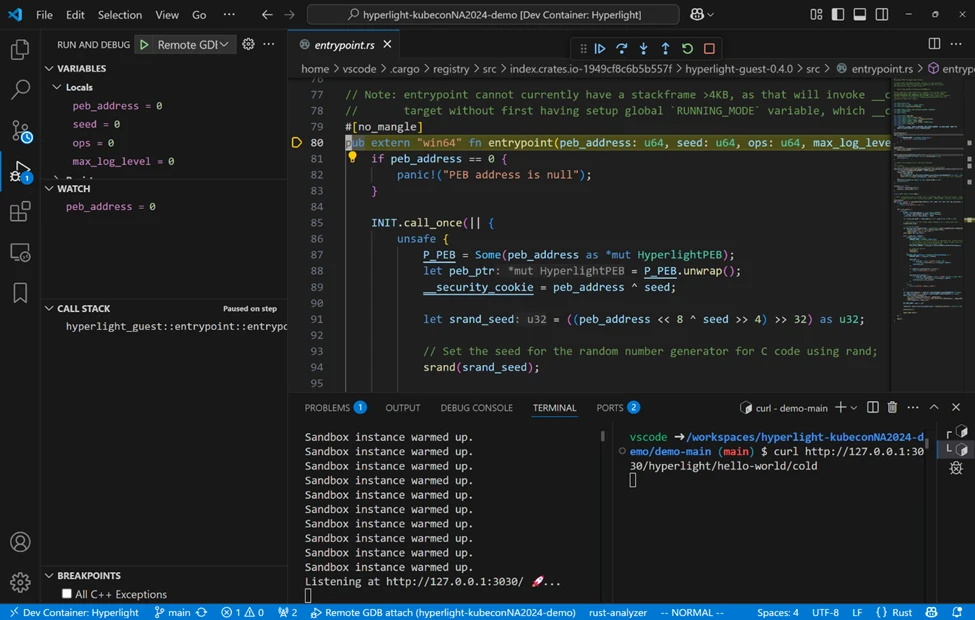
After pressing the green play button, the debugger attaches. At this point, the micro-VM sandbox has been created, and the debugger has automatically stopped at the guest entrypoint function. This function enables the guest to create and configure the micro-VM sandbox. You can think of the entrypoint function as a kind of “main()” function for the micro-VM.
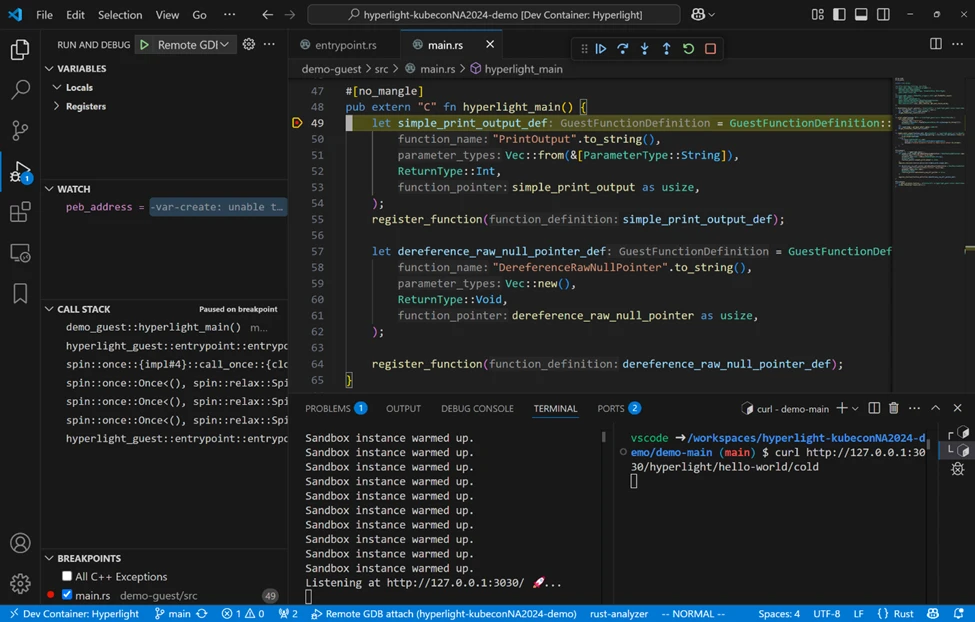
You can now play around with the debugger and the functions, but typically we want to focus on the guest functions. Let’s set a breakpoint in the first function a guest implements that executes inside the micro-VM. Once blocked on entrypoint, navigate to the demo-guest/src/main.rs file and set a breakpoint on the hyperlight_main implementation. Press Continue (F5) so that you continue executing until you block on hyperlight_main.
Before you finish stepping through the function (or you can restart the debugging session if you need to), set a breakpoint in the simple_print_output and print_output functions and then continue the execution so that the guest stops at simple_print_output. This function is the first “guest HTTP request processing function” that we wanted Hyperlight to protect while handling the HTTP request. This function, however, merely calls a host callback function, HostPrint. (The debugger can’t be set on that function, as it’s implemented in the hyperlight-host crate and can be used by any function unless overridden.)
Note, however, that when you Continue (F5), the guest function turns around and calls the print_output function.
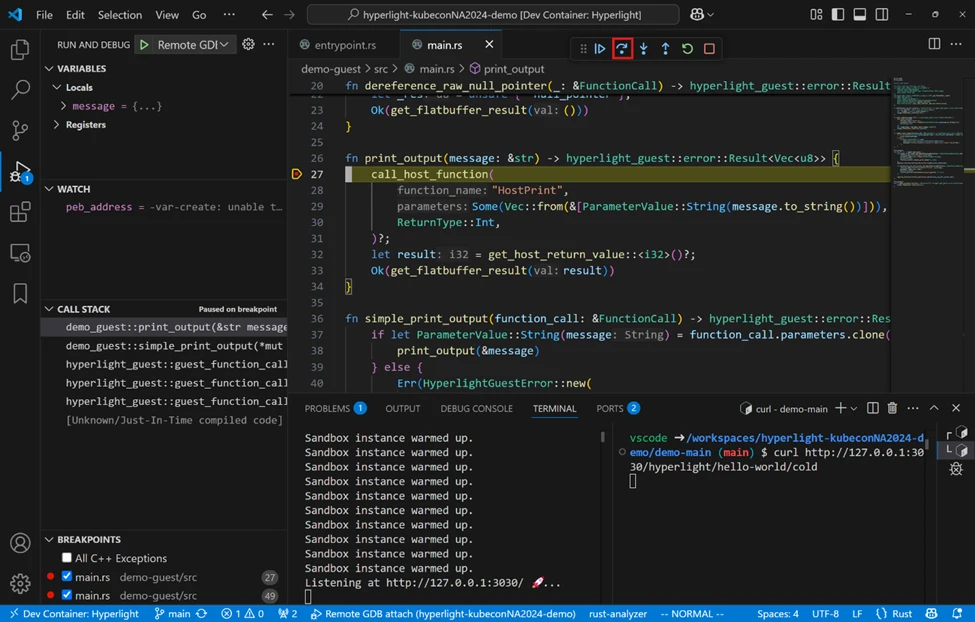
Let’s now step over this function by pressing the Step Over button (notice the red rectangle in the picture above) and at the same time look at the terminals below and notice the Hello, World! I am executing inside of a VM : ) message being printed on the terminal running the host application. You can continue the execution and see the HTTP request returning a message signaling the guest has successfully run.
That’s it! You have successfully debugged your first Hyperlight sandbox.
Now that you have successfully debugged a guest running in Hyperlight sandbox, let’s explain how it was configured to allow debugging.
Let’s open the demo-main/src/hyperlight/hello-world.rs file and have a look at the cold function that handles the route we have hit by using the curl command.
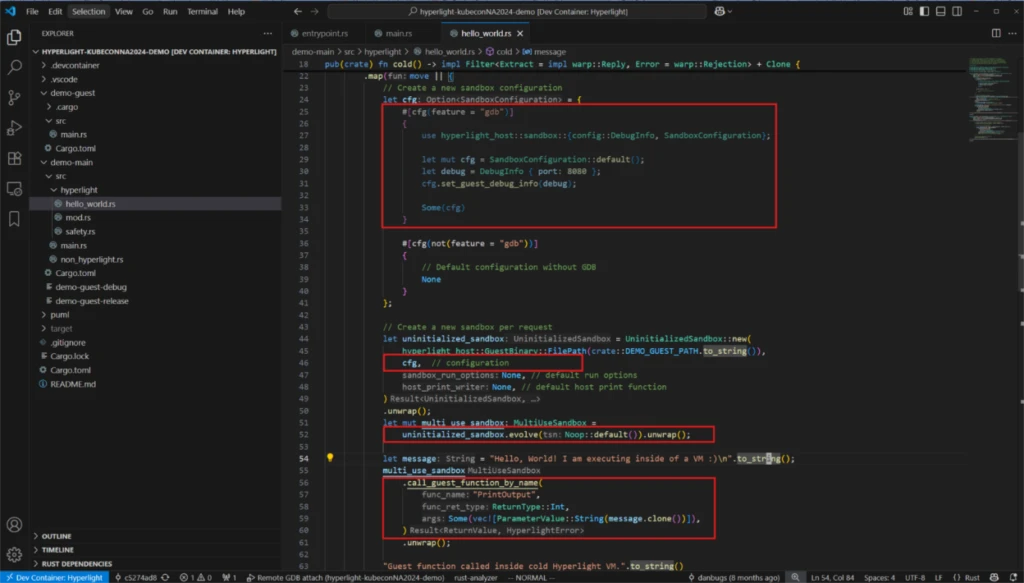
The first thing you’ll notice is the first red rectangle above being greyed out, which means it is not compiled, right? That is true but remember we ran cargo run –features gdb in a previous step, which enables this area of code.
You can see the four highlighted areas above. The first one is the configuration for the Sandbox—this tells Hyperlight that the Sandbox expects a debugging session on port 8080 by setting the DebugInfo { port: 8080 } in the SandboxConfiguration.
This configuration is provided to the UninitializedSandbox::new and later, when the evolve and call_guest_function_by_name methods are called, the host application waits for the guest to be debugged.
The next important piece of information is the debugger that needs to use the port that the sandbox was configured with to establish a debugging session. You can check .vscode/launch.json out and see the configurations needed by VSCode to run GDB and LLDB to debug a Hyperlight Sandbox.
This is all you need to do to enable debugging of a sandbox in your application.
Hyperlight expects a sandbox to provide a DebugInfo to the SandboxConfiguration for it to enable debugging in the specific sandbox. If a DebugInfo is provided and the `gdb` feature is enabled when a new sandbox is created, a separate thread (let’s call it gdb thread) is spawned.
The GDB debugger uses a text-based protocol to exchange messages between the client and the target being debugged. The GDB thread listens for an incoming TCP connection from a debugger to start the GDB protocol communication.
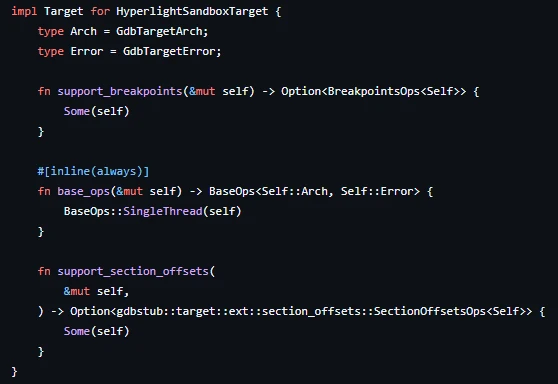
To understand the GDB protocol Hyperlight uses the `gdbstub` rust crate. This crate allows Hyperlight to run an event loop which invokes callbacks corresponding to the commands received. The callbacks are implemented through traits that Hyperlight uses to provide functionality for each supported feature.
Between the GDB thread and the sandbox, there is a communication channel that allows the commands from GDB to be sent over to the sandbox. The sandbox processes the command and sends back a response to the GDB thread.
Having instantiated a vCPU using KVM, the vCPU handle is a VcpuFd type. When a command that resumes execution is received, the sandbox calls the run method on the vCPU handle and waits for it to finish.
For the sandbox to start processing messages again, the vCPU needs to exit with a VcpuExit::Debug reason. The sandbox tries to figure out why the vCPU stopped and sends an event to the GDB thread to notify the reason.
The other commands that do not resume execution only change the guest memory or the vCPU registers. These changes affect the vCPU after it resumes execution following a debugging command.
This article explains what Hyperlight guest debugging is and why it is needed. Additionally, we show how to set up an example using a KVM guest, and we go deeper into detail explaining how it works under the hood.
To experiment with the example, please check out the repository and follow the instructions in this article to set up a debugging session on a guest. More information on this can be found in the repository docs. The information present in this guide also applies to HyperV on Windows and Linux guest applications—the only differences lie in the way each hypervisor is instructed to enable debugging of the vCPU due to different hypervisor APIs.
How Microsoft uses AI agents and Drasi to keep open‑source documentation accurate and working.

The Cloud Native Computing Foundation’s (CNCF) Hyperlight project delivers faster, more secure, and smaller workload execution to the cloud-native ecosystem.
For decades, fragments and unofficial copies of Microsoft’s 6502 BASIC have circulated online, mirrored on retrocomputing sites, and preserved in museum archives. Coders have studied the code, rebuilt it, and even run it in modern systems. Today, for the first time, we're officially releasing it under an open-source license.

Wassette empowers AI agents to securely fetch and run Wasm tools, enabling dynamic, permission-controlled capabilities with zero dependencies.